Switching to Omarchy: The first 24 hours
/ 8 min read
Table of Contents
Introduction
Last year (2025) I installed Omarchy on my spare laptop to see what all the fuss was about, but I never got beyond the initial setup and playing around with it. This week I decided to go full in on it.
The reason?
Firstly because I felt bored and uninspired with doing the same stuff I’ve been doing the past 20-odd years - which is .NET development. I needed some excitement!
Secondly because I cannot stomach Windows and Microsoft anymore. I am not going on a rant about them because (a) I want to keep this focused on Omarchy/Linux and (b) I will not waste another brain cycle on them.
So, I completely wiped my Windows desktop PC and installed Omarchy and decided this is sink or swim time. This is the first, of what would hopefully be a series, of posts on my experience and learnings.
A word of warning though: I am a complete noob with Linux and things that may seem obvious to others are not to me.
Problems with the initial setup
I ran into problems from the get-go. I had three USB drives lying around and for some reason Windows could not detect the first two. Thankfully, it recognised the third one, so I installed Omarchy on it by downloading the ISO and flashing the drive using balenaEtcher.
I updated my BIOS to disable Secure Boot and TPM and tried to boot from the USB, but the BIOS could not see the USB drive. I asked Google/Gemini and it suggested that I update the BIOS to disable UEFI and switch to CSM.
I did that and the BIOS picked up the drive correctly. However, it could not boot from it. So, I did more research and it seemed that UEFI should definitely be enabled. So I reverted back from CSM to UEFI.
I saw a suggestion that the drive was not flashed correctly, so I switched to Rufus. Immediately upon starting the process I realised something went wrong when I used balenaEtcher. When using balanaEtcher, to process to seconds. With Rufus, it took 10+ minutes - so it definitely was doing something that balenaEtcher wasn’t doing.
I tried to boot from the USB drive again, and this time it was picked up correctly and I was able to boot from it.
The installation process went pretty smooth and within a few minutes I was up and running.
Screenshot keybinding not working
I was impressed with the fact that my Logitech MX Master 3S and MX Keys S keyboard was working perfectly out of the box.
However, the standard Omarchy key binding for taking screenshots was not working. I needed this as I find it easier to paste a screenshot image into Claude as I worked through configuring the computer and ask it to solve the problem for me.
The problem is that the MX Keys S does not have a traditional print screen button. I has a button that captures a screenshot, but it does not emit the standard PrtScn key code.
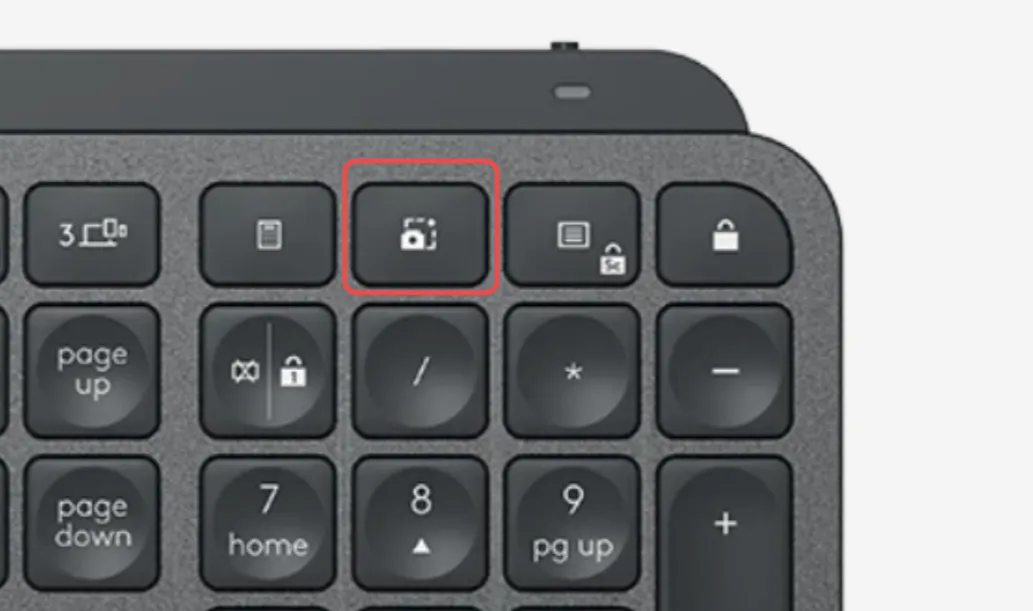
Instead, it maps to Windows + Shift + S - which is used to launch the Windows Snipping tool. On Windows you can remap keys using the Logi Options+ software, so my initial searches for comparable software turned up Solaar.
Upon hearing the name, something clicked in my head and I remember working through this problem some months back when I connected the MX Keys to my laptop. I started my laptop up, looked at the Solaar config and came to the conclusion that I could not get it working at that time either.
So, I took the path of least resistance and decided rather than try to remap that particualar hardware key, it would be easier to just add a keybinding for the keystroke it emits - Windows + Shift + S.
With that in mind, I added the following key binding in my ~/.config/hypr/bindings.conf file:
# bind print screen to logitech keyboard screenshot buttonbindd = SUPER SHIFT, S, Screenshot of region, exec, ~/.local/share/omarchy/bin/omarchy-cmd-screenshotIt worked perfectly!
Configuring SSH
I did not want to go too far into setting up my computer without documenting things (i.e. writing this blog post), so I had to clone my existing repo from GitHub so I could start writing this blog post.
On Windows, I used Git Credential Manager and cloned by repos using HTTPS. Since I’m now using Linux I wanted to do this the “Linux-ey” way and decided that I needed to setup SSH instead.
With Claude by my side, I set off on a crash course with adding an SSH key and adding it to GitHub. I used ssh-keygen to generate a new key and then added it to GitHub.
Sadly, this did not work :( It seemed the SSH agent was not running.
However, at this time I also came to the conclusion that the recommended way to use SSH on Omarchy seemed to be to use 1Password as an SSH agent.
So, I configured 1Password as my SSH agent, created a new SSH key, added it to GitHub, and I was off to the races.
Installing and configuring Zed
Next, I needed to be able to edit this blog post. It seems using NeoVim is the “Omarchy way”, but learning that, along with a new OS, seemed like a bridge to far. I’ll check it out eventually, but for now, I needed something easier.
In keeping with minimizing the use of Microsoft software, I decided to give Zed a go, rather than VS Code.
I installed it (open the Omarchy menu and go to Install -> Editor -> Zed) and could open it from the Omarchy app launcher. Trying to open it from the terminal using the zed command did not work. It turns out that on Omarchy, you launch it using the command zeditor.
I am editing this blog post using Zed, but there are a few things I miss from editing markdown in VS Code.
- There are no markdown shortcuts built into Zed and there are no extensions filling this gap (yet). On the VS Code side, there are plenty of extensions available to improve the markdown editing experience.
- The Paste Image extension in VS Code is a massive time saver when taking screenshots when writing blog posts. Once again, I could not find something similar on the Zed side.
I developed the Copy Markdown as HTML extension for VS Code 10 years ago on an 8-hour layover in South Korea. So, perhaps that is where I can start off with my new adventures: to try and address some of the gaps in the Zed extension market.
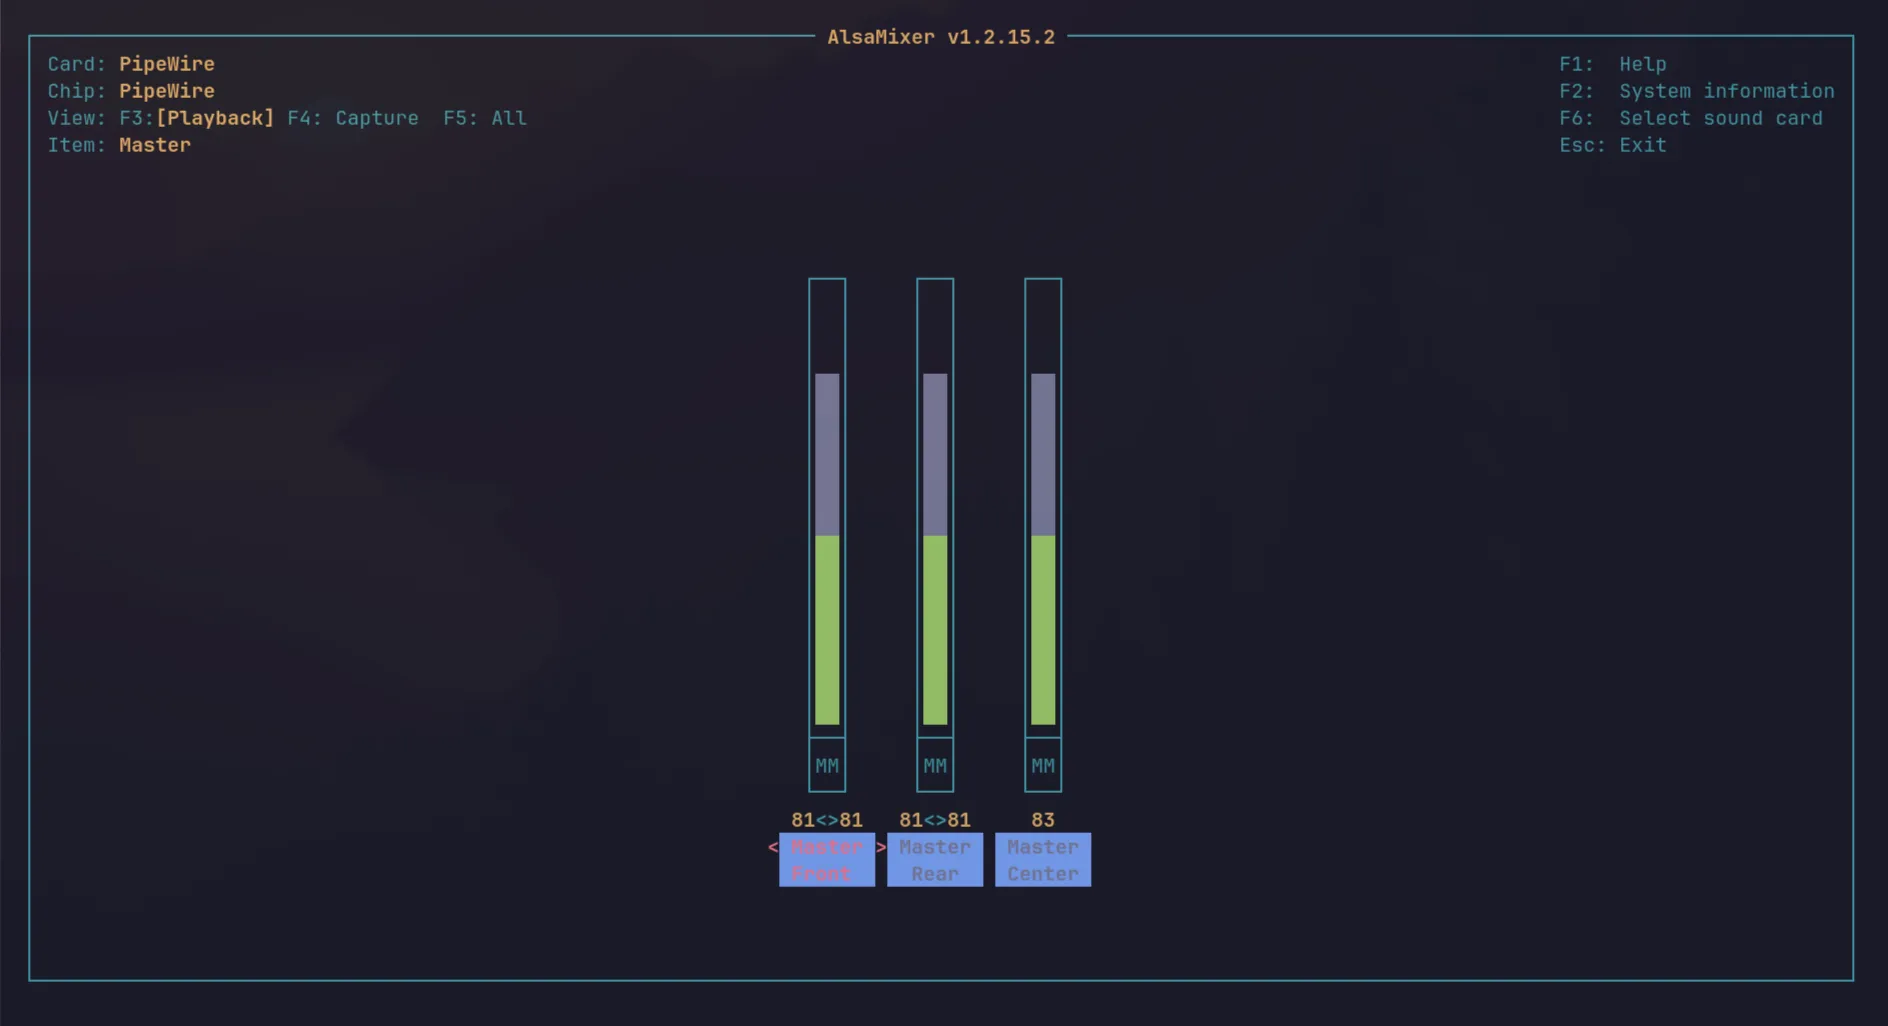
Low volume
I noticed that the volume when watching YouTube videos seemed very low compared to Windows. It seems this is a common complaint on Omarchy and had an easy fix available by installing ALSA utilities.
Open the Omarchy menu, go to Install -> Package, the search for and install “alsa-utils”.
Once installed, run alsamixer from the terminal and adjust the volume.
Some random notes
Here are some final random notes:
- This is exciting stuff. I feel like that 16 year old kid again from 1987 starting up a new computer and looking at a blank command prompt. At that time I used BBSs and later on usenet groups to learn. This time around I have AI and the whole wide internet to hold my hand.
- The
Super + Kshortcut is your best friend. It will display a searchable popup with all the key bindings and is a great way to discover how to navigate the different parts of Omarchy. - AI (specifically Claude) has been a lifesaver in this process. I was able to work through many of the issues so much faster than if I had to rely on plain search.
Where to next
I’ll continue working with Omarchy and documenting my learnings.
Also, I have been a .NET Developer since the very first preview releases at PDC 2000. I was a Delphi developer at the time and a huge Anders Hejlsberg fan, so switching over from Delphi to .NET was a natural transition for me.
I will continue to use .NET in my day job, but I want to explore new languages and frameworks. I have used a number of the TanStack libraries on a previous project and enjoyed their approach to developing software. I want to start getting deeper into their stack and look at the new TanStack Start.
As mentioned above, there seems to be big gaps in the Zed extension marketplace. Perhaps I can start looking into addressing some of those. My boss is a huge Rust fan, so I’ll start harrassing him to teach me a bit.