Introduction
This is the first is a series of blog posts on using Google Authentication with ASP.NET Core. Most blog posts covers just the first part - which is adding the Google login. I want to go beyond that and talk about more follow-on topics such as using access tokens, creating test users, limiting users by domain, auto-provisioning, etc.
To get to those more advanced topics, we need to cover the basics first and that is what this blog post is about: adding Google login to your app.
This blog post, and the series in general, is not about adding Google Authentication as an external provider for ASP.NET Core Identity. This is about using Google authentication as the only way a user can log in to the application. Identity does not come into play at any point.
This is ideal for applications where you have tight integration to the Google ecosystem, where all users will have a Google account, and where your application will likely want to access some of those Google services on behalf of the user.
That being said, you can certainly use the advanced techniques when using Google as an external authentication provider for Identity.
Getting the application URL
I am going to assume you already have an application you want to add Google Authentication to. For the purpose of this blog post, I created a basic MVC application without any authentication by running the following command:
dotnet new mvc -au NoneWe are interested in the URL of the application as we will need that for the following step. Run your application and take note of the URL.
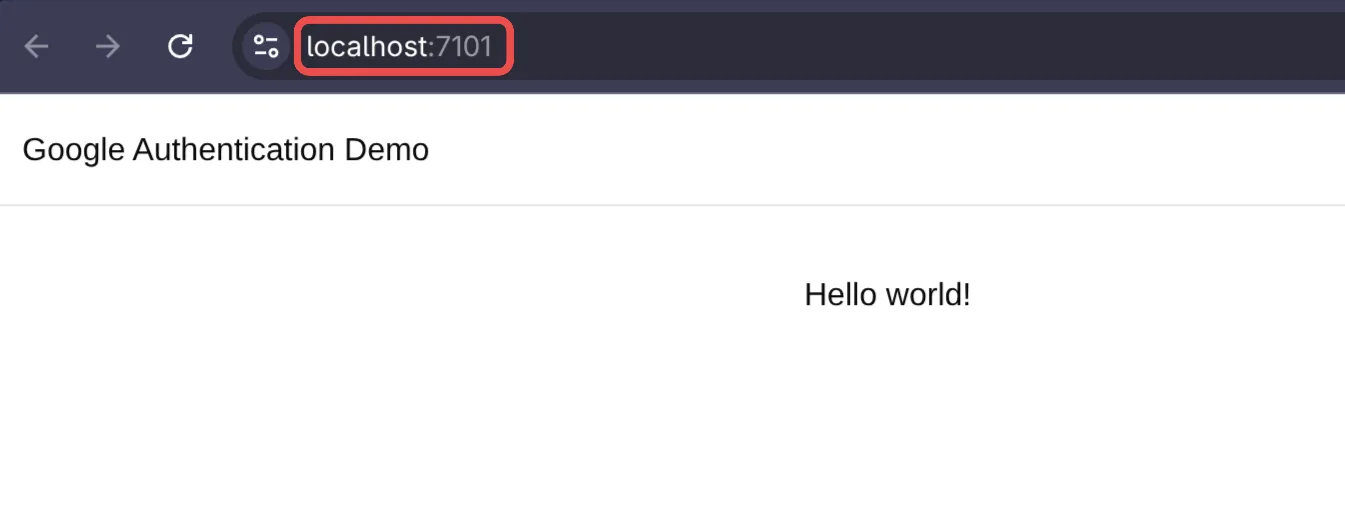
Registering the OAuth application
We will be using OAuth to authenticate with Google and for that we will need to register a project on Google Cloud Console and add an OAuth application. I will move over this part quickly and just cover the important settings.
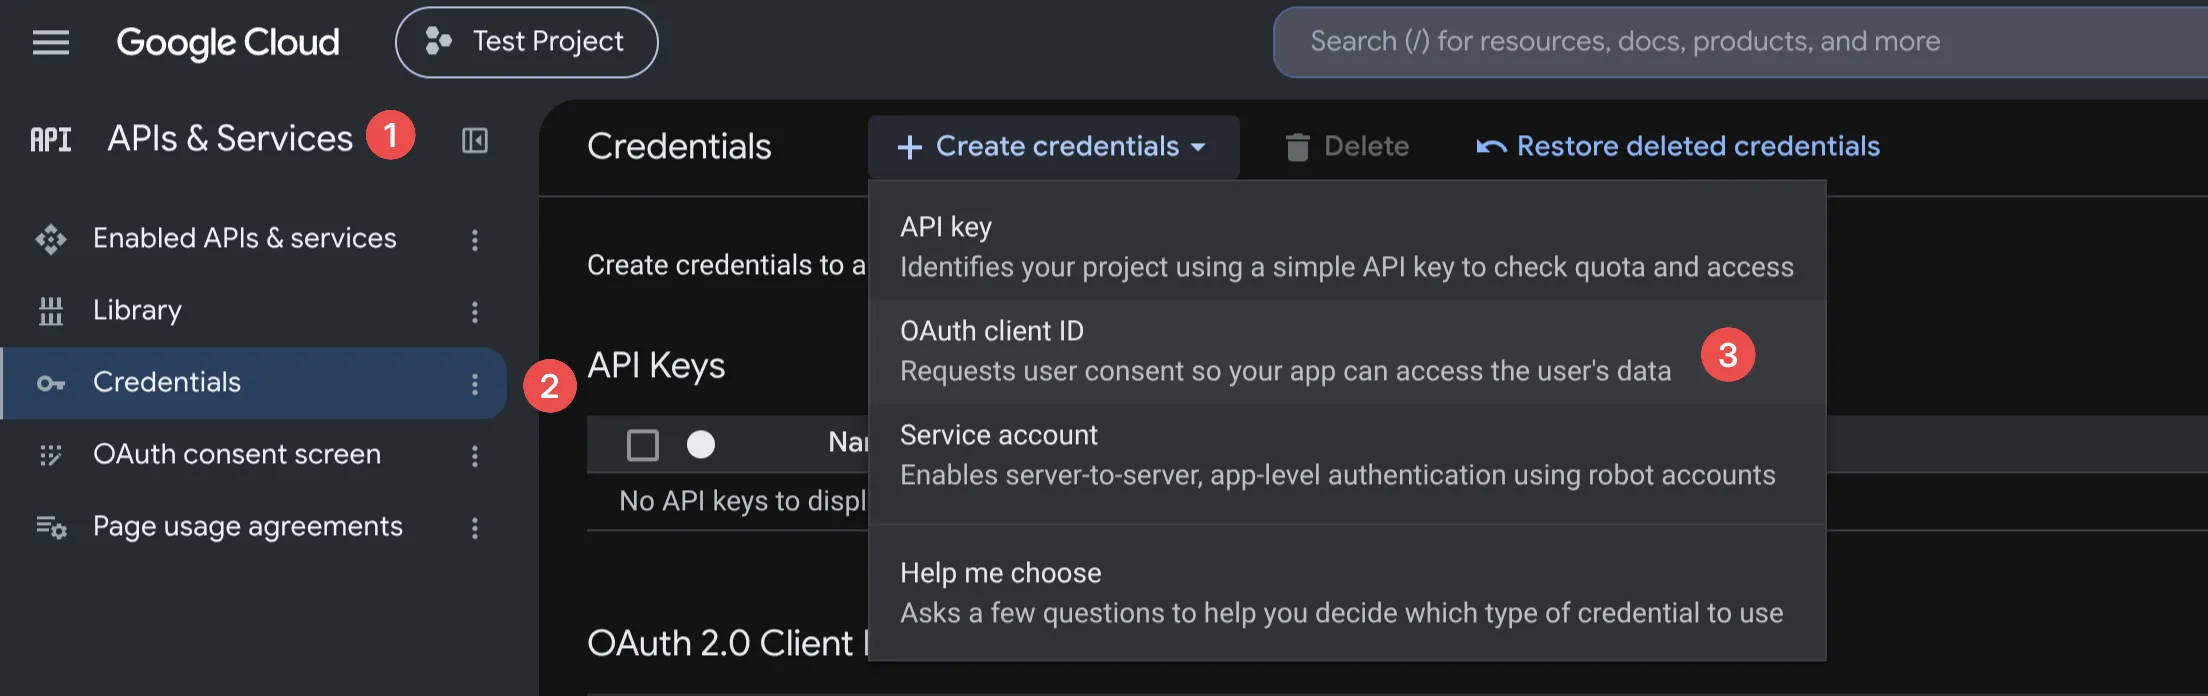
Go to the Google API Console. Make sure you are on the APIs & Services section (1), go to Credentials (2), then click on the Create credentials button and select OAuth client ID (3).
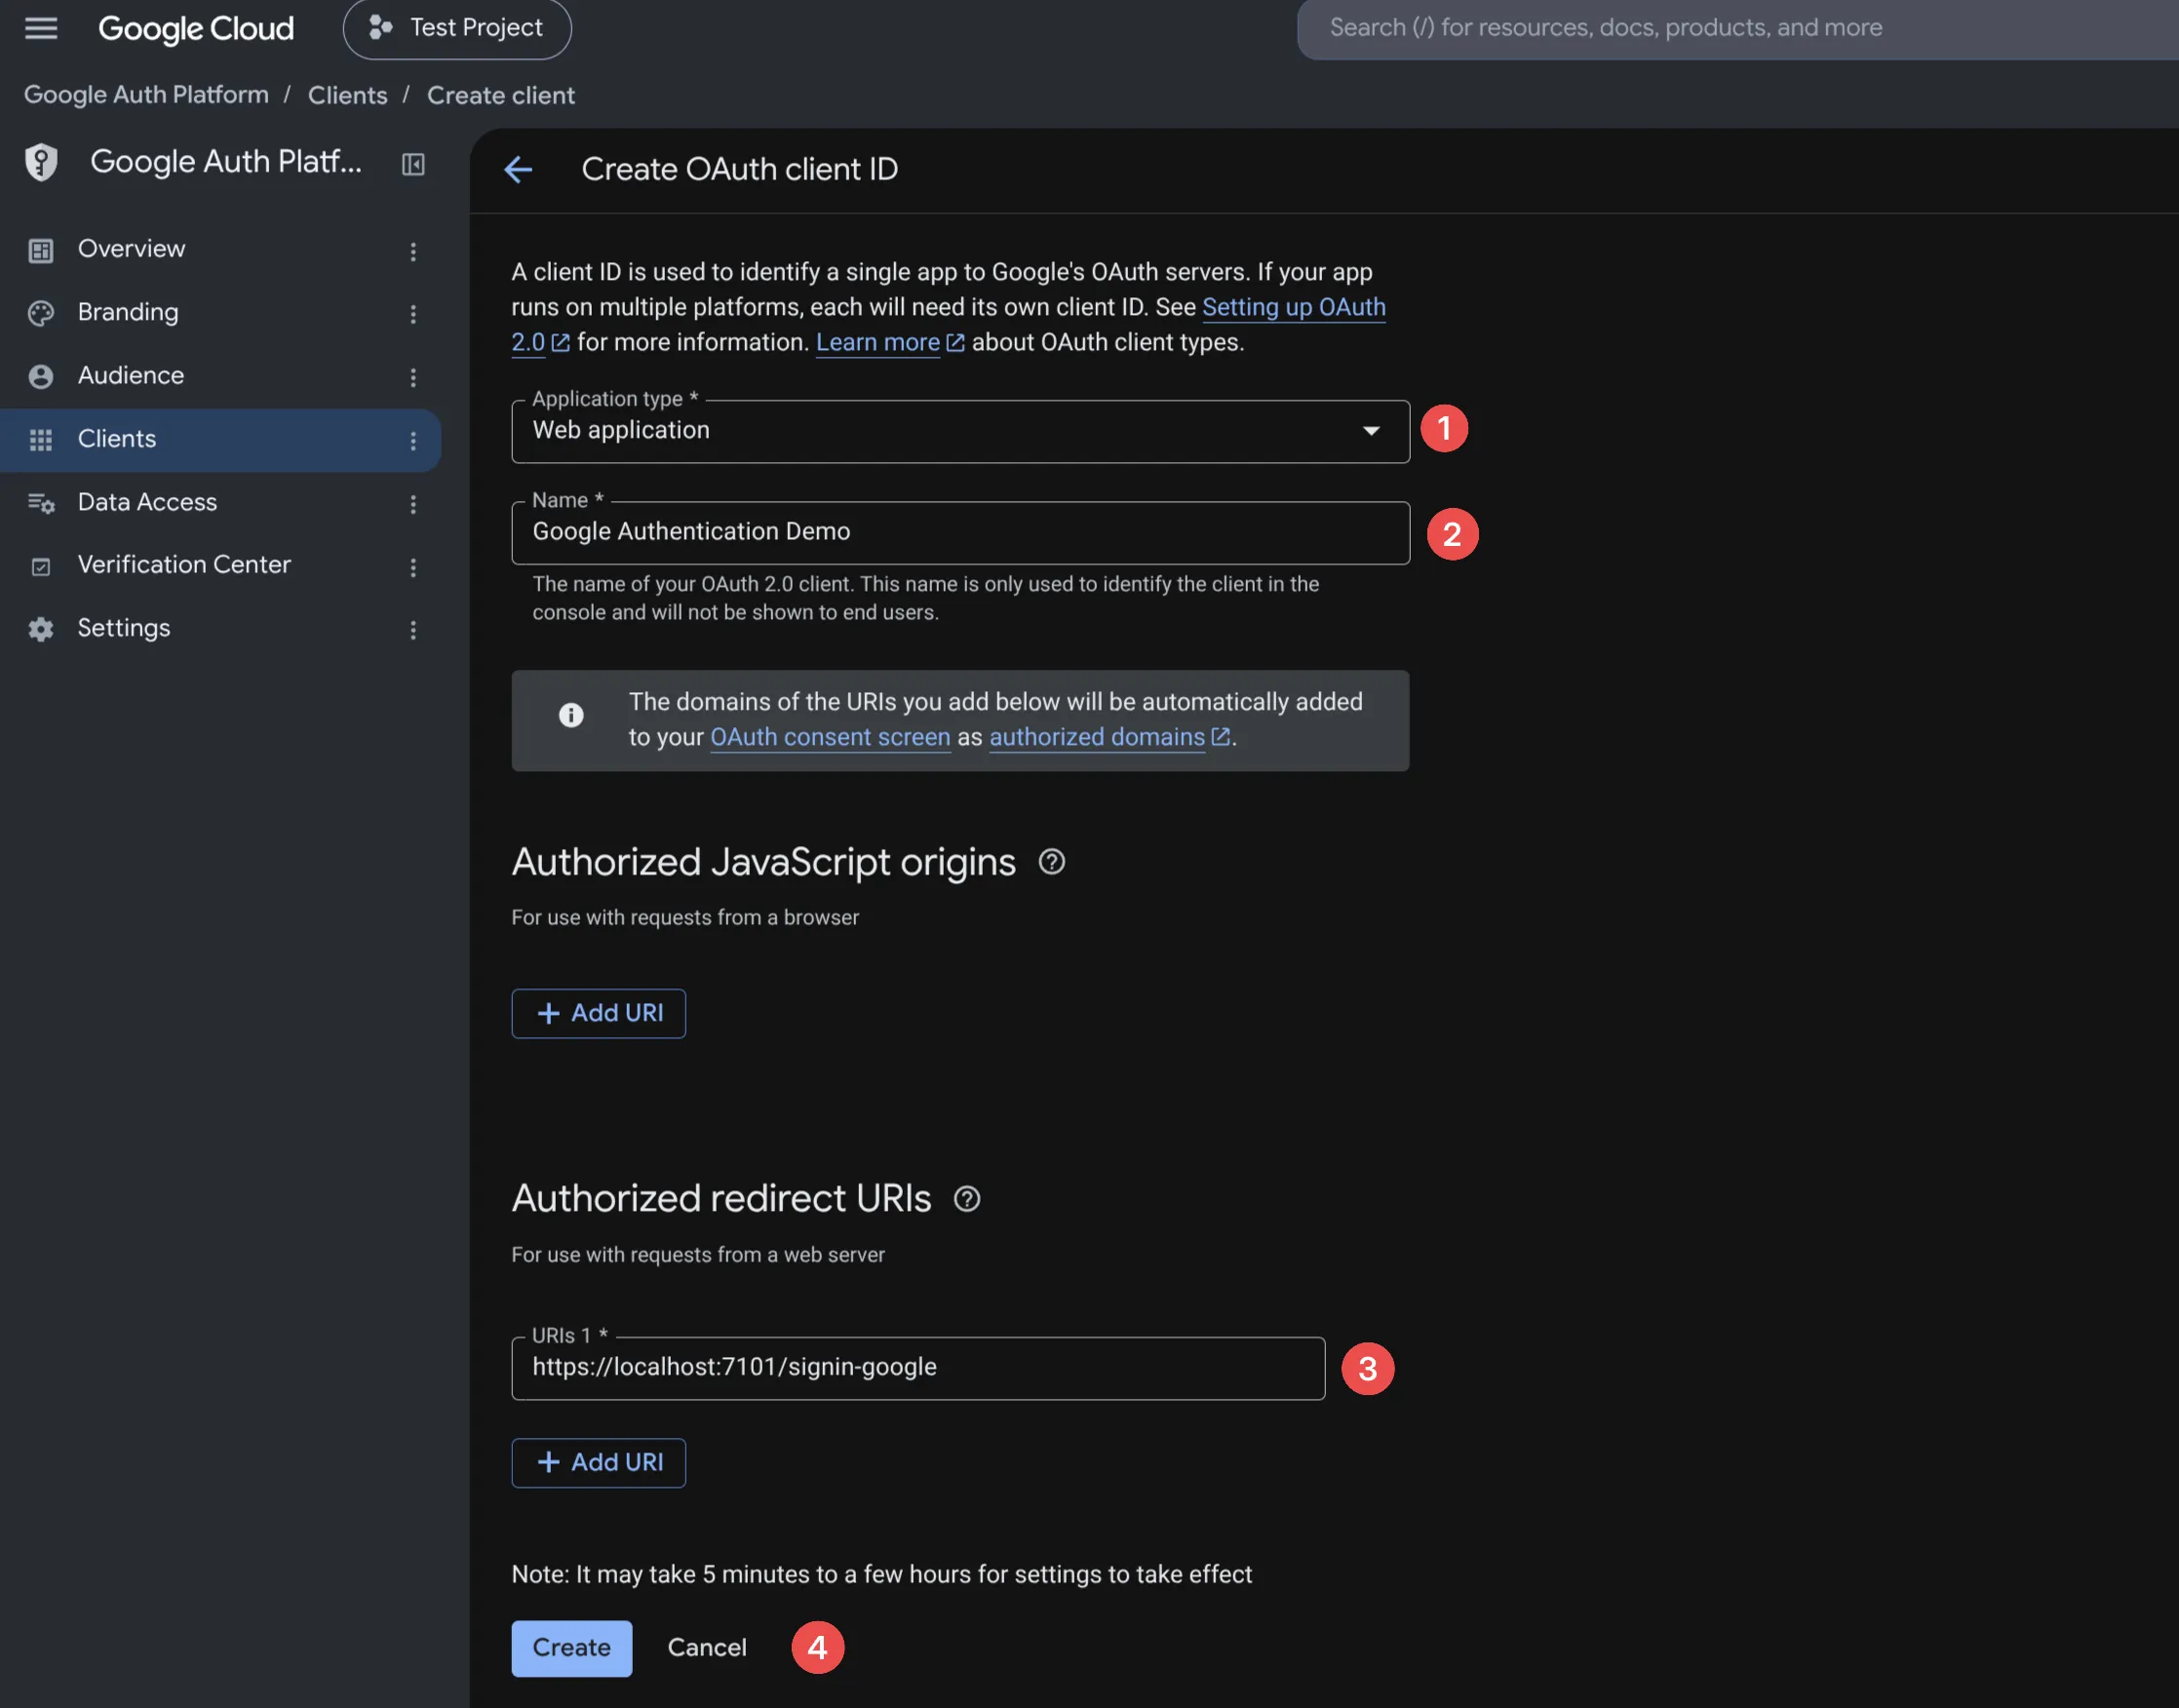
Select Web application as the application type (1), enter a name for the application (2), add the URL of your application with the path /signin-google as an authorized redirect URI (3), then click the Create button (4) to add the new OAuth client.
After creating the OAuth Client, Google will display the Client ID and Client secret you need when configuring the OAuth authentication provider.
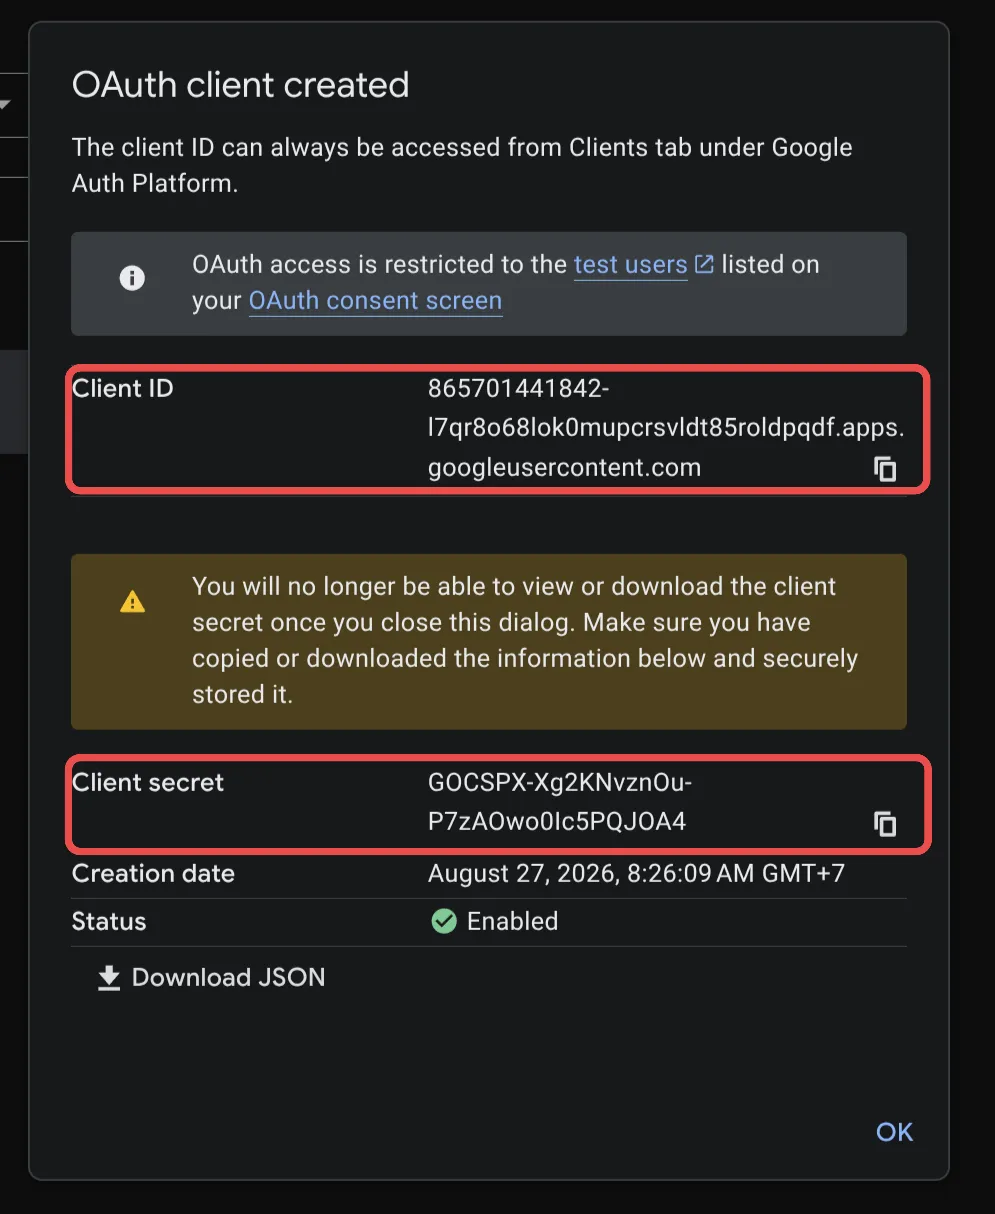
Add them as secrets to your application.
dotnet user-secrets set Authentication:Google:ClientId <your-client-id>dotnet user-secrets set Authentication:Google:ClientSecret <your-client-secret>Some notes about client registration and secrets
Before we continue, I want to note a few things.
- The OAuth client registration above is for development purposes. You will need to create a new client for production and every other environment you have, each with their own authorized redirect URIs, Client ID, and Client secret. I would also strongly suggest you create separate Google Cloud projects for each environment.
- I used the Secret Manager tool for storing the secrets. You should consider using some sort of centralized storage for these - even for the developer environments. Consider something like Azure Key Vault, AWS Secrets Manager, or similar products.
Adding the authentication provider in ASP.NET Core
For Google, we can authenticate using either the Microsoft-provided Microsoft.AspNetCore.Authentication.Google NuGet package, or the Google.Apis.Auth.AspNetCore3.
We will use the latter since it is provided by Google and plays well with the NuGet packages for all the other Google APIs. It also handles things like refresh tokens on our behalf.
dotnet add package Google.Apis.Auth.AspNetCore3Next, we need to add the authentication services to the Program.cs.
var builder = WebApplication.CreateBuilder(args);
builder .Services.AddAuthentication(options => { options.DefaultScheme = CookieAuthenticationDefaults.AuthenticationScheme; options.DefaultChallengeScheme = GoogleOpenIdConnectDefaults.AuthenticationScheme; }) .AddCookie() .AddGoogleOpenIdConnect(options => { options.ClientId = builder.Configuration["Authentication:Google:ClientId"]; options.ClientSecret = builder.Configuration["Authentication:Google:ClientSecret"];
options.CallbackPath = new PathString("/signin-google"); });
//.. rest of code omitted-
The call to
AddAuthentication()adds the various authentication services. Since we will be using cookie authentication, we set theDefaultSchemeto the cookie authentication scheme as it will be used for authentication.The
DefaultChallengeSchemeindicates which scheme we will use to authenticate a user when we do not have a valid authentication cookie for them. In this case it will be the Google OIDC authentication provider. -
AddCookie()adds the cookie authentication. As I said above, this is how we will check whether a user is already authenticated. This is also where the user’s authentication details will be stored after they log in with Google. -
AddGoogleOpenIdConnect()adds the Google OIDC authentication provider. We configure it with theClientIdandClientSecretwe previously stored in the secret storage, and also set theCallbackPathto what we specified in the authorized redirect URI when we created the OAuth client.
We also need to add the authentication and authorization middleware.
var app = builder.Build();
//...
app.UseAuthorization();app.UseAuthentication();
//...
app.Run();Adding the login route
Right now the user will be sent to Google to authenticate whenever they try to access a protected route and do not already have an authentication cookie. Since we do not have a protected route in the application yet, we can just add a login button which will call a controller action that will explicitly try and authenticate them.
public class HomeController : Controller{ public IActionResult LoginWithGoogle() { var properties = new AuthenticationProperties { RedirectUri = Url.Action("Index") };
return Challenge(properties, GoogleOpenIdConnectDefaults.AuthenticationScheme); }}And we can add a button to the Index.cshtml that will invoke this action.
<sa-linkbutton asp-action="LoginWithGoogle">Log In</sa-linkbutton>Running the application at this point and clicking the button will redirect us to Google where we can authenticate with our Google account.
Displaying user information
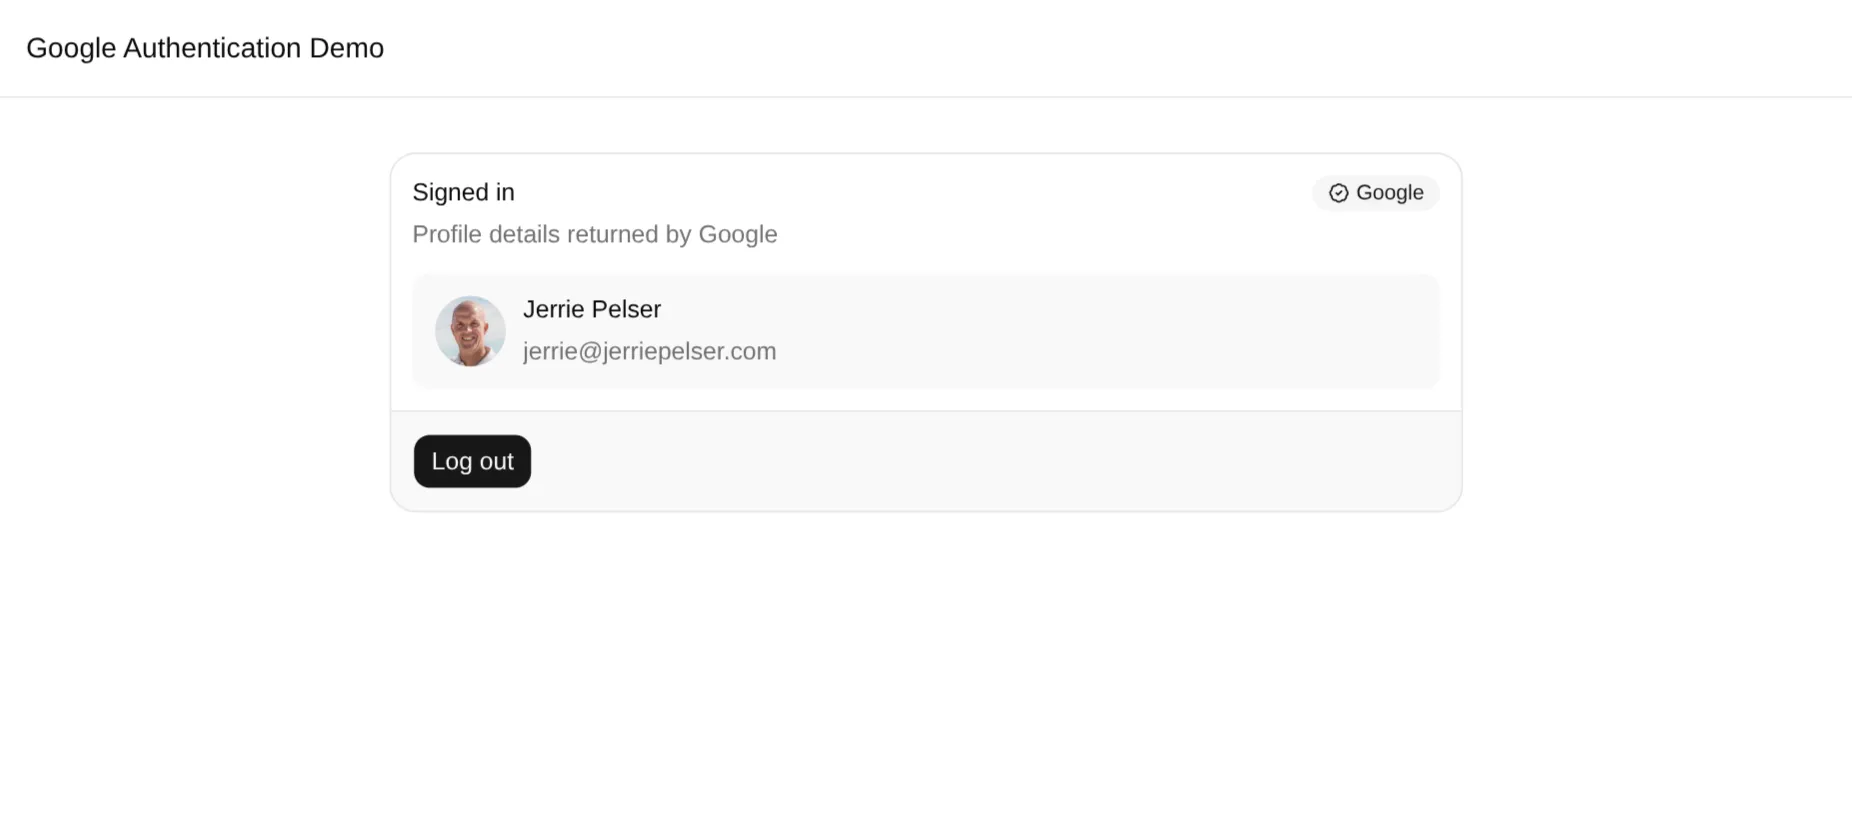
Once the user is logged in, I would like to display their personal information on the home page. The Google OIDC provider returns all the necessary user information as claims. Let’s extract that information in the Index action and store it in a view model we can pass to the Razor view.
public class HomeController : Controller{ public async Task<IActionResult> Index() { var indexViewModel = User.Identity?.IsAuthenticated == true ? new IndexViewModel( new IndexViewModel.UserViewModel( User.FindFirstValue("name"), User.FindFirstValue(ClaimTypes.Email), User.FindFirstValue("picture") ) ) : new IndexViewModel(null);
return View(indexViewModel); }}Now when we log in, we can see the user’s profile displayed in the application.
Calling a Google service
When a user logs in, the Google OIDC provider also returns an access token and refresh token which we can use to call other Google APIs on the user’s behalf. Let’s look at how we can use this to access the user’s information using the YouTube data API.
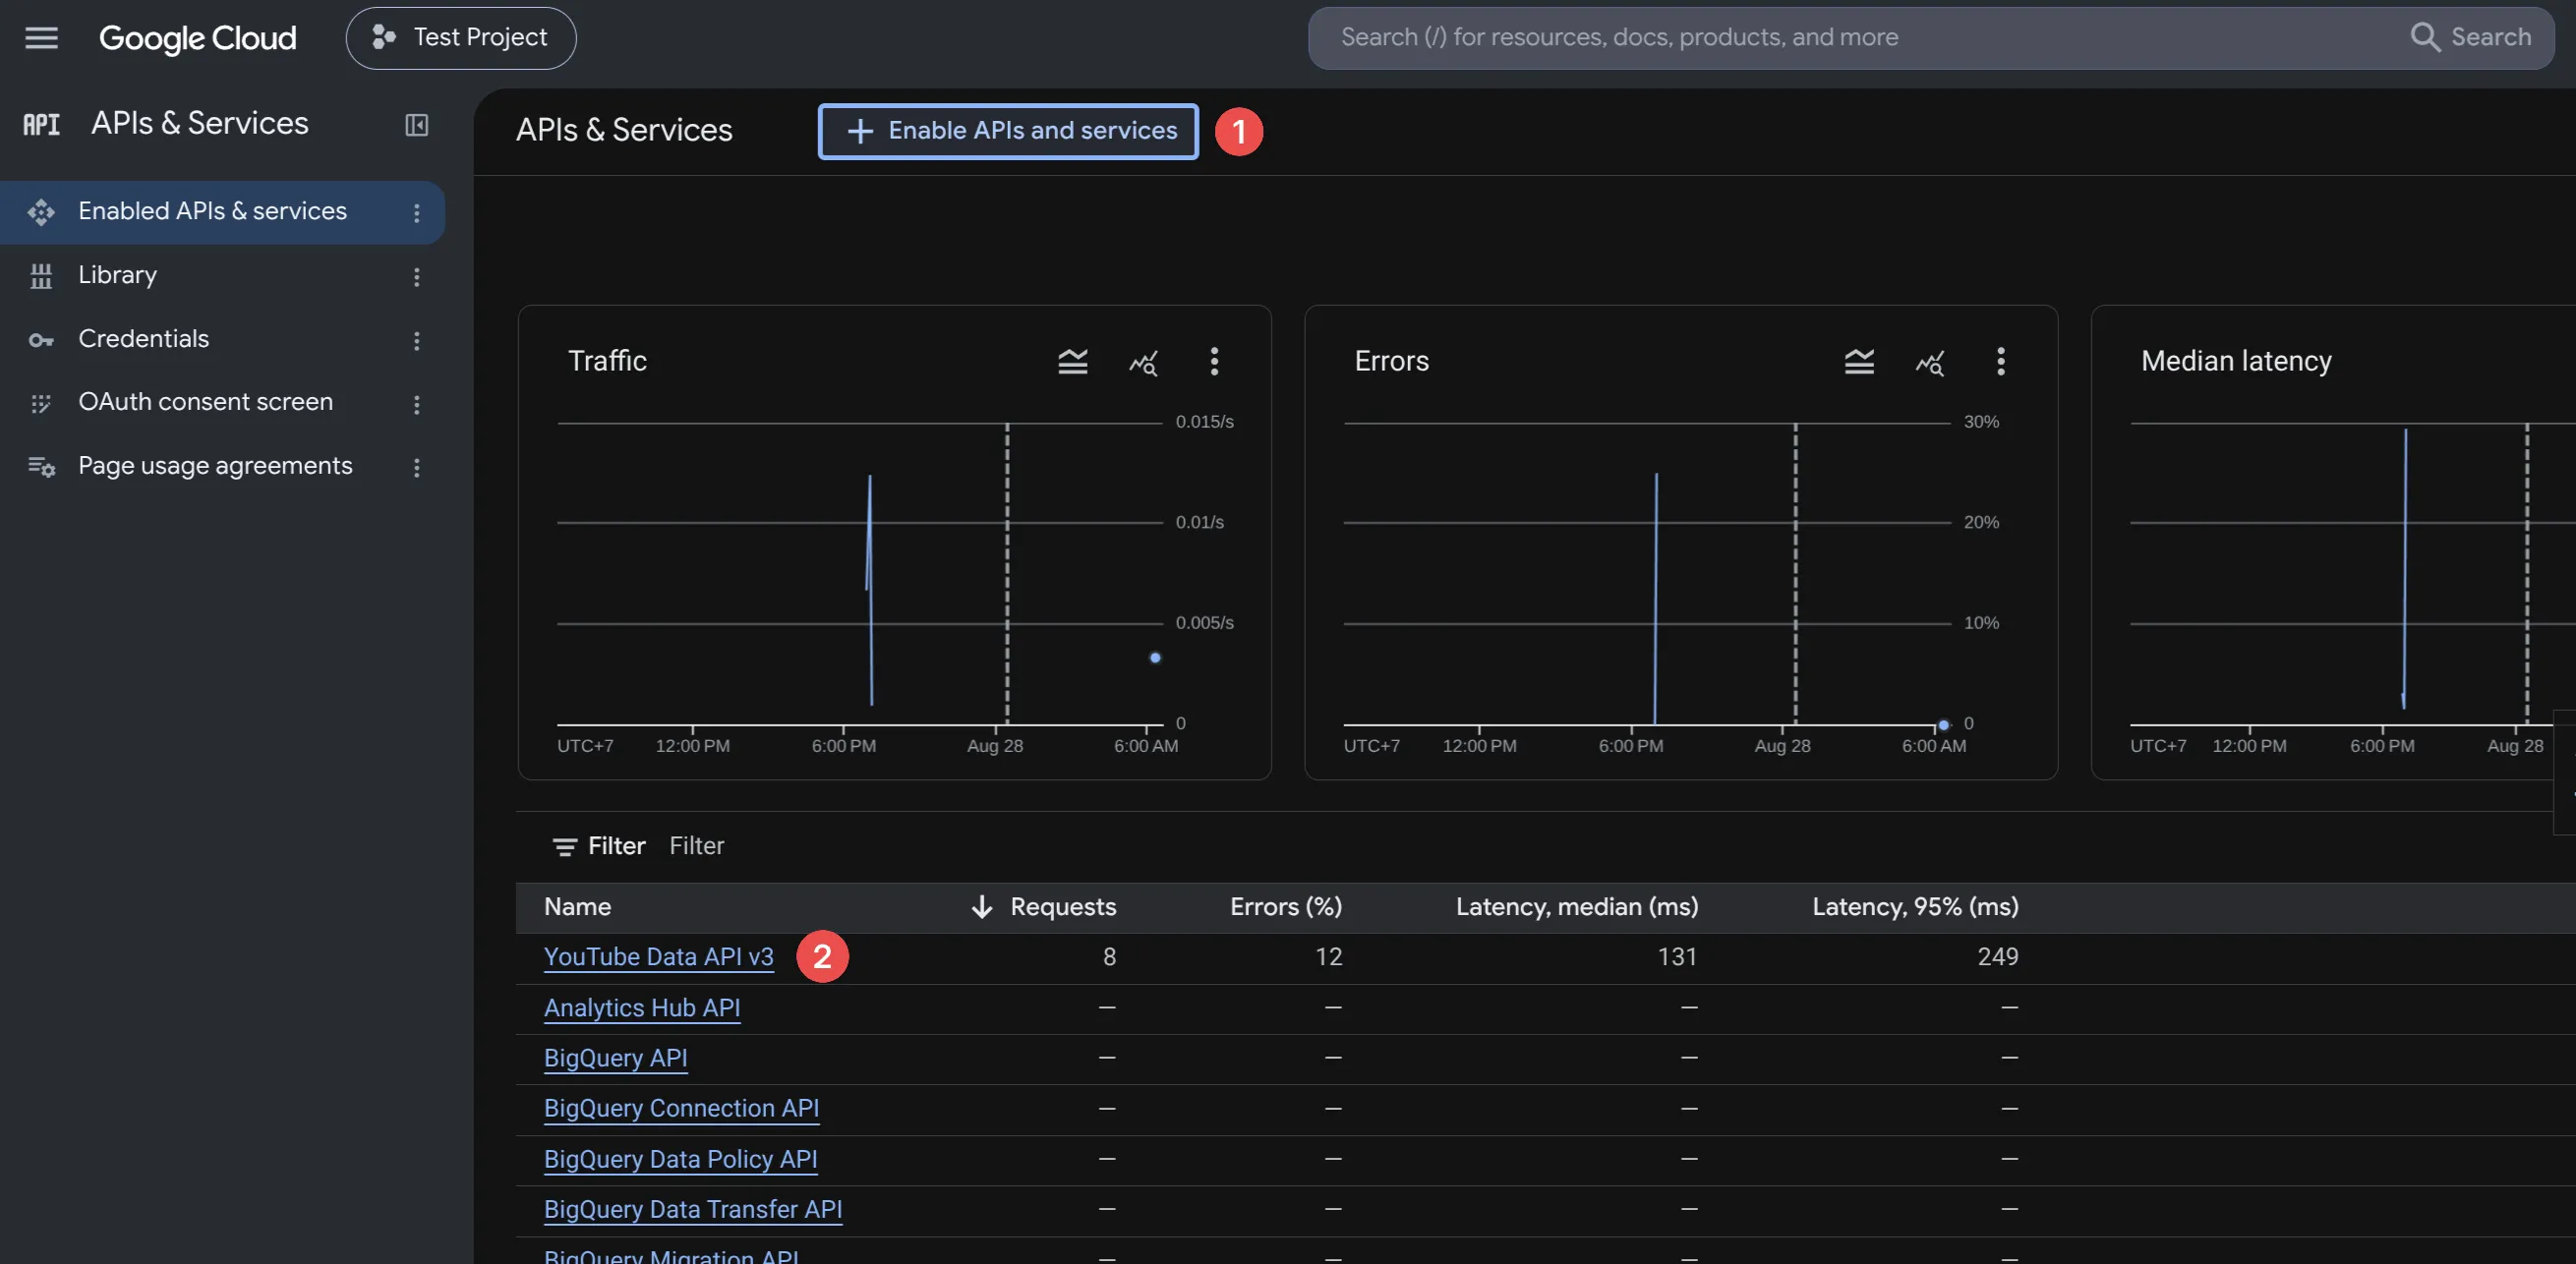
The first thing you will need to do is to enable the Google API you want to use in the Google Cloud Console. Go to your application in Google Cloud Console, then to APIs & Services -> Enabled APIs & Services, and click the Enable APIs & Services button (1). Search for YouTube Data API v3 and enable it. Once enabled, you should see it listed under the enabled APIs (2).
We also need to install the NuGet package for the YouTube Data API:
dotnet add package Google.Apis.YouTube.v3Then we need to update the Google OIDC authentication provider registration to request the correct scopes we need to access the YouTube API. In this case, we need to request the https://www.googleapis.com/auth/youtube.readonly scope.
builder .Services.AddAuthentication(options => { options.DefaultScheme = CookieAuthenticationDefaults.AuthenticationScheme; options.DefaultChallengeScheme = GoogleOpenIdConnectDefaults.AuthenticationScheme; }) .AddCookie() .AddGoogleOpenIdConnect(options => { options.ClientId = builder.Configuration["Authentication:Google:ClientId"]; options.ClientSecret = builder.Configuration["Authentication:Google:ClientSecret"];
options.CallbackPath = new PathString("/signin-google"); options.Scope.Add("https://www.googleapis.com/auth/youtube.readonly"); });Next, let’s update the Index page to retrieve the user’s playlists from YouTube. We can inject IGoogleAuthProvider (which comes with the Google OIDC NuGet package) into the controller and then use that to retrieve the users credentials and pass that on to the YouTube Data API to retrieve the authenticated user’s playlists.
public class HomeController(IGoogleAuthProvider googleAuthProvider) : Controller{ public async Task<IActionResult> Index() { var playListItemViewModels = Array.Empty<IndexViewModel.PlayListItemViewModel>(); var userViewModel = User.Identity?.IsAuthenticated == true ? new IndexViewModel.UserViewModel( User.FindFirstValue("name"), User.FindFirstValue(ClaimTypes.Email), User.FindFirstValue("picture") ) : null;
if (User.Identity?.IsAuthenticated == true) { try { var credential = await googleAuthProvider.GetCredentialAsync();
var youTubeService = new YouTubeService( new BaseClientService.Initializer { HttpClientInitializer = credential } );
var playlistRequest = youTubeService.Playlists.List("snippet,contentDetails"); playlistRequest.Mine = true; var playListResponse = await playlistRequest.ExecuteAsync();
playListItemViewModels = playListResponse .Items.Select(i => new IndexViewModel.PlayListItemViewModel( i.Snippet.Title, i.Snippet.Thumbnails.Default__?.Url )) .ToArray(); } catch { // Ignore } }
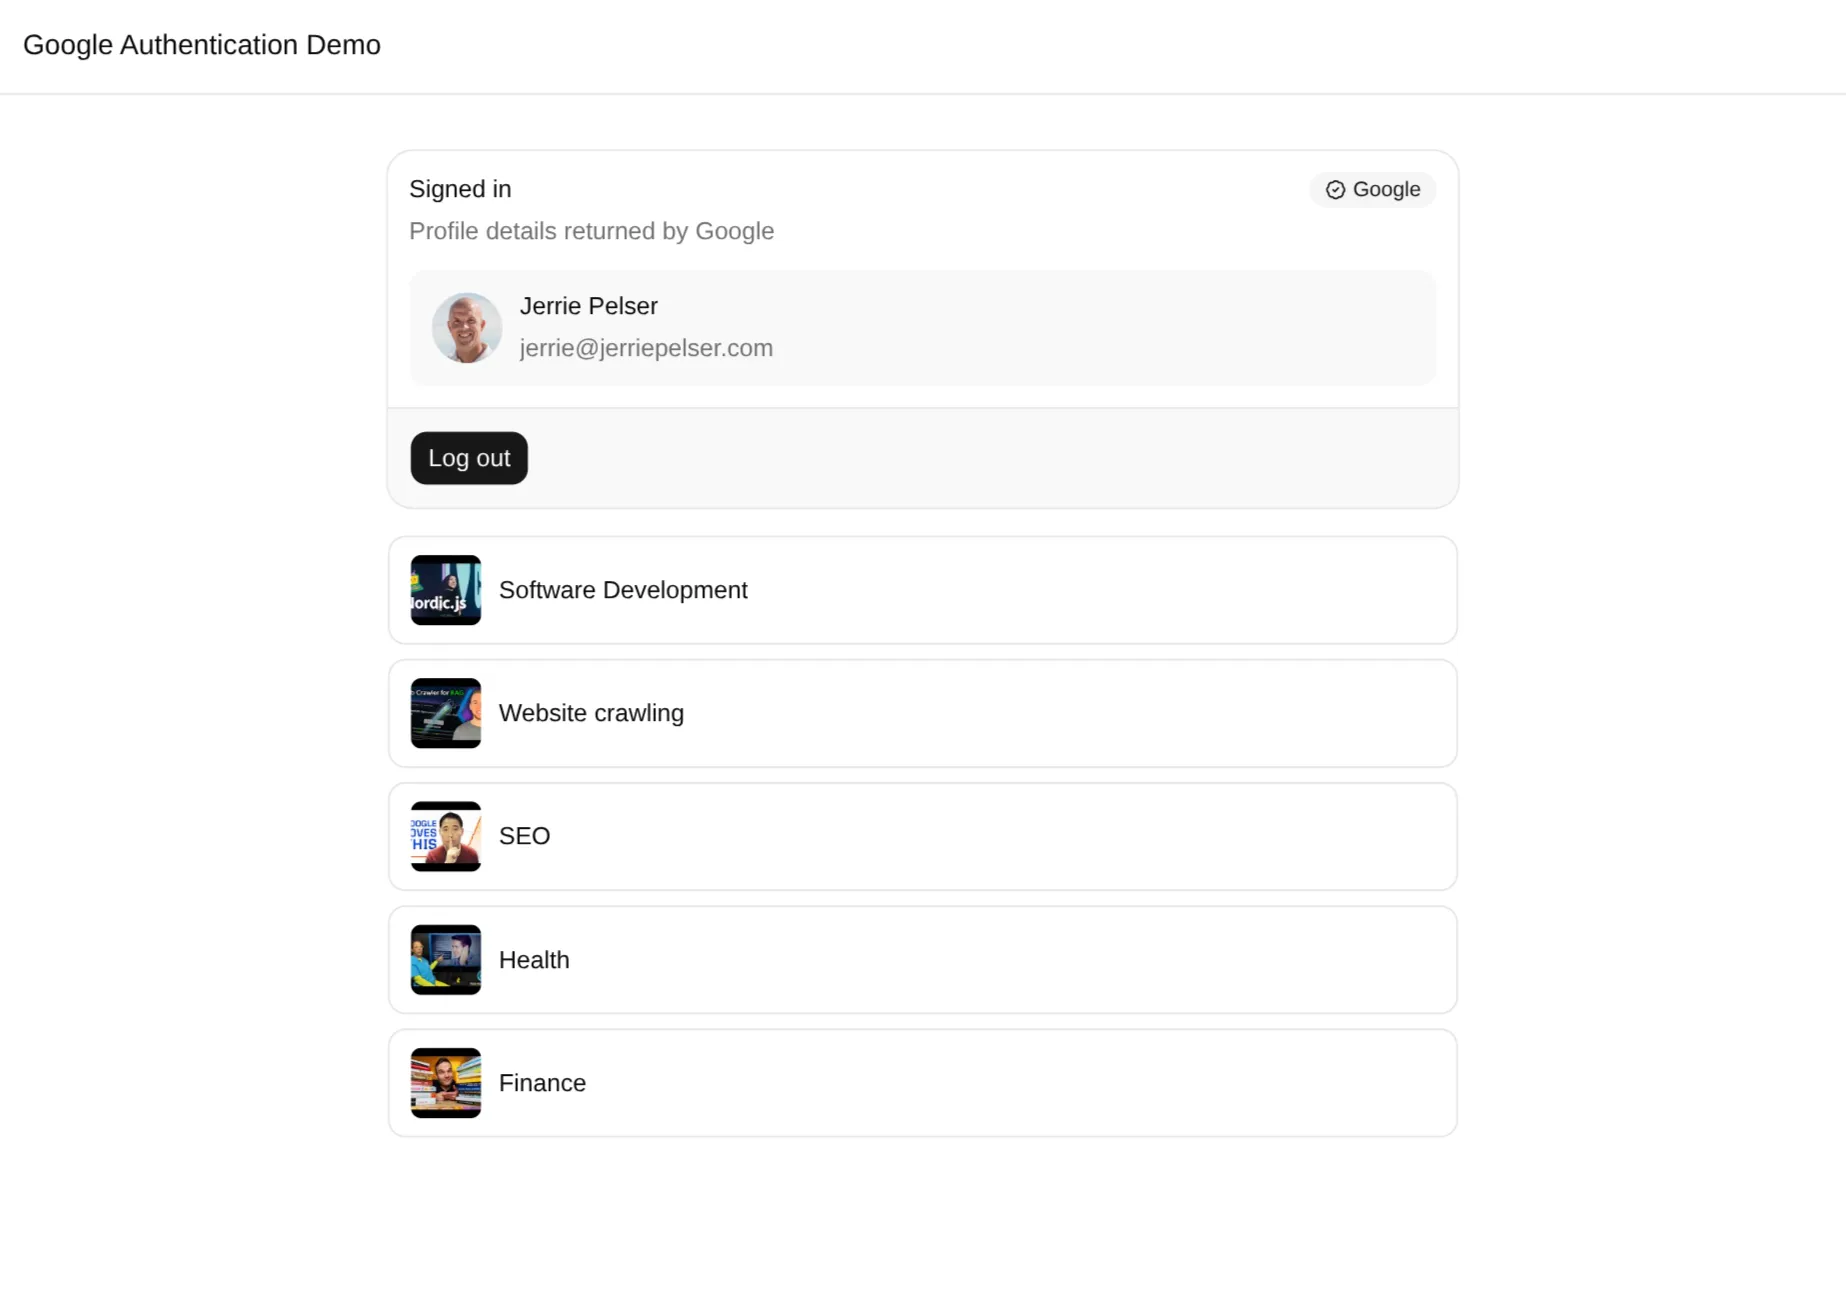
return View(new IndexViewModel(userViewModel, playListItemViewModels)); }}With that in place, we can run the application again and you can see the logged in user’s profile along with their YouTube playlists listed below that.
A note about the credentials
I have mentioned previously that we need the access token to call APIs on the user’s behalf, yet you can see I never used the access token explicitly anywhere in the code. This is one of the reasons I used the Google.Apis.Auth.AspNetCore3 NuGet package for authentication, as it plays well with all the other Google NuGet packages from Google.
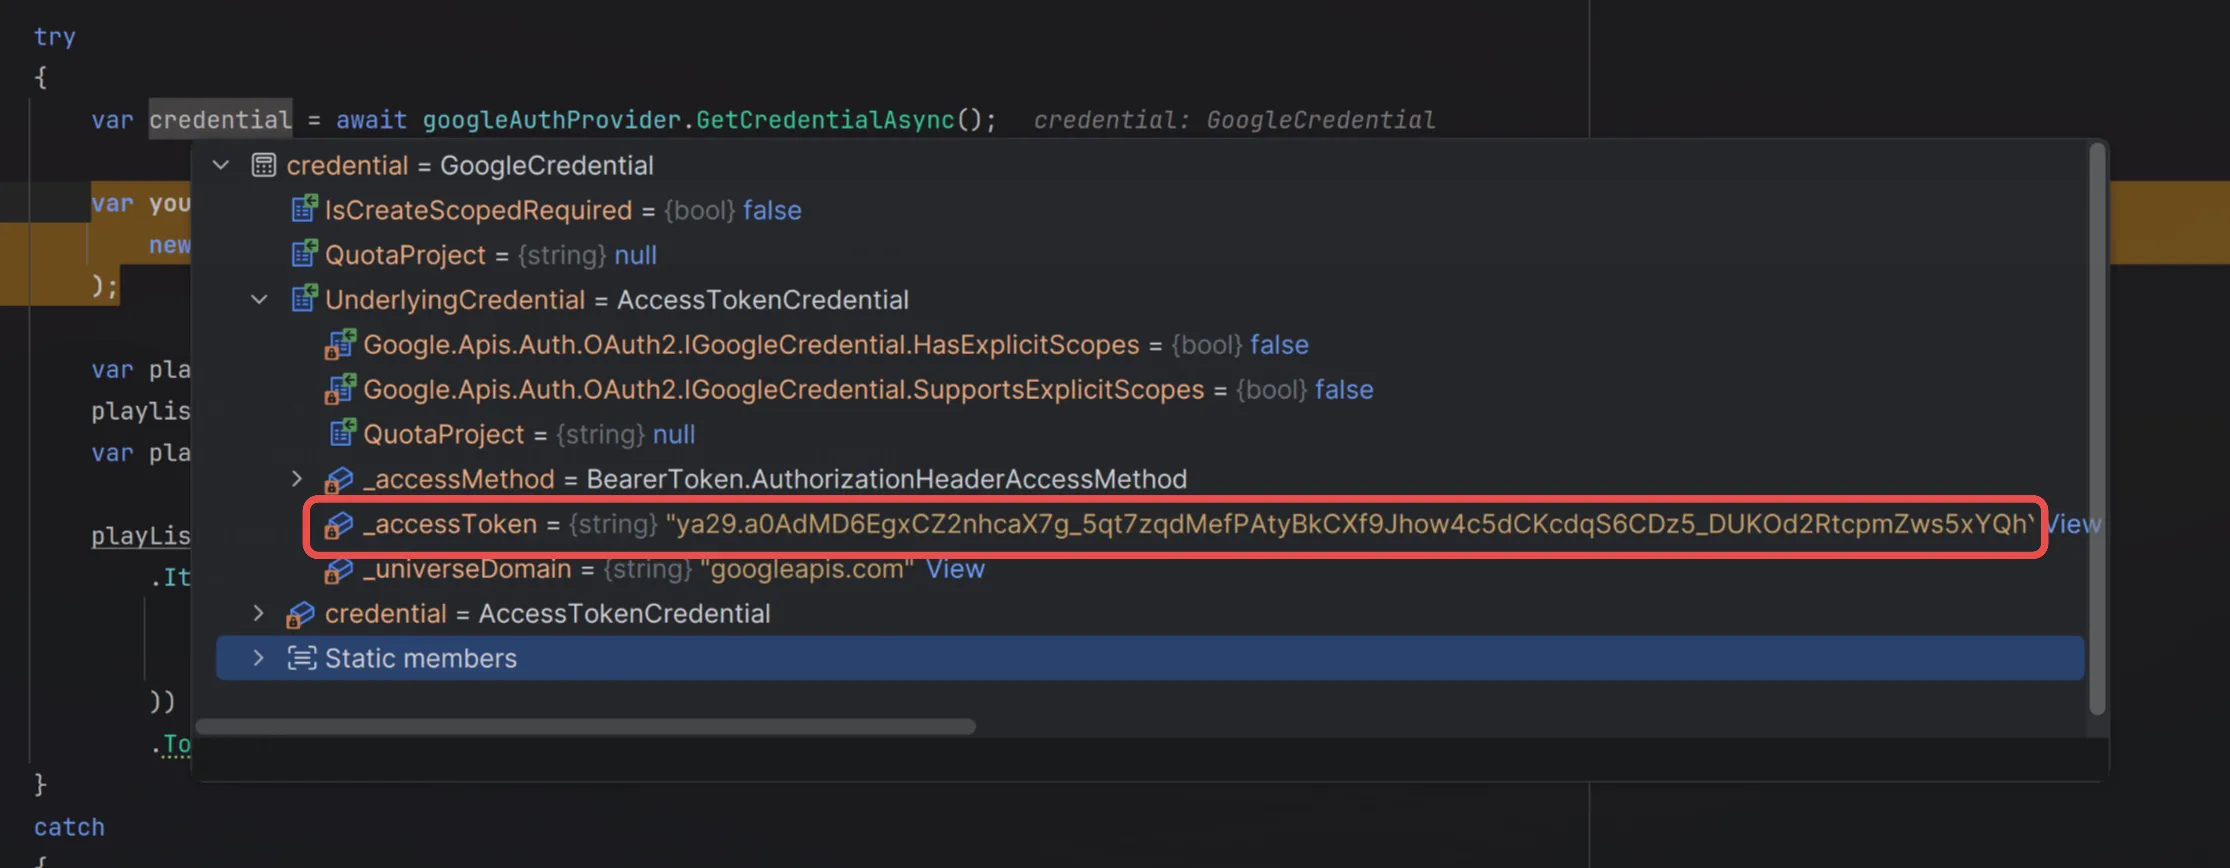
In this case, we injected IGoogleAuthProvider and called the GetCredentialAsync() method. This returns a GoogleCredential instance which is what you can pass to all the Google NuGet packages, as we did when we instantiated a new instance of YouTubeService.
Internally, GoogleCredential contains an underlying credential inheriting from IGoogleCredential - which has various different implementations. In our specific case, since we used OIDC to log in, it contains an AccessTokenCredential which in turn contains the actual access token necessary to authenticate the user when calling the YouTube API.
So, things are a little but abstracted away from you, but these are the basic mechanics of how it works under the hood.
Conclusion
In this blog post I demonstrated how you can add authentication via Google to your ASP.NET Core application. I also demonstrated how you can use the user’s access token to call other Google APIs on the user’s behalf, for example to retrieve their YouTube playlists.
I deliberately skimmed over some of the code in this blog post. If you want to look at the code in more detail, you can find it at https://github.com/jerriepelser-blog/google-authentication/tree/master/basic-auth.